

After setting our goal of achieving a designer-inspired home on a DIY budget, we encountered one of our biggest challenges: the living room’s rectangular shape. Balancing the desire for an open layout with defined spaces for the dinning room space and the living area posed a creative dilemma. However, implementing wainscoting on our focal wall proved to be a game-changer. Not only did it enhance the living space, but it also introduced a much-needed architectural element. Painting the wall white further amplified the sense of space and cleverly created a visual illusion of a continuous wall leading up to the raised ceiling. In our upcoming discussion, we’ll dive into the process of building this stunning wall and share practical tips for recreating it in your own home. Let’s get started!

HOW TO INSTALL WAINSCOTING ON WALL:
1. REPLACE THE BASEBOARDS:
The first step in installing the Wainscoting Wall involved removing the old baseboards. Opting for upgraded 6-inch thick baseboards not only refreshed the space but also infused a modern vibe into the living room wall. This simple upgrade made a significant impact, setting the tone for the entire project and enhancing the overall aesthetic appeal of the room.
2. SKETCH AND MEASURE:
With the baseboards securely in place, our next step was to measure the space meticulously and draft a sketch outlining our vision for the wall. Taking precise measurements allowed us to calculate the exact amount of materials required for the project. Below, you’ll find our sketch detailing the planned design and a comprehensive list of the materials we utilized. This crucial planning phase ensured a smooth and efficient execution of the project, setting the stage for transforming our vision into reality.
3.GATHER MATERIALS FOR THIS PROJECT:
Here’s a simple list of essential items you’ll need for your Wainscoting Wall project. I’ve included affiliate links, which means I earn a small commission from any purchases made through these links, at no extra cost to you. This helps support our work and allows us to continue providing helpful content. Thank you for your support!
- Wainscoting panels
- Baseboards
- Chair rail molding
- Nails
- White Nails or screws
- Level
- Measuring tape
- Saw (if cutting panels to size)
- Liquid Nails
- Caulk Gun
- Primer Paint
- Paint
- Paintbrushes
- Paint rollers
These items will set you on the right path for creating a beautiful Wainscoting Wall in your home. Feel free to click on the links to find the products we recommend. Happy crafting!
4. PREPARE THE WALL:
After gathering our materials, the next step was to remove the existing molding from the walls. We carefully sanded down any imperfections and removed any nails to ensure that the wall was smooth and prepared for our project. This crucial step laid the foundation for a flawless installation and ensured that our Wainscoting Wall would look polished and professional once completed.
4. CUT AND INSTALL:
With precise measurements in hand, we carefully cut the 1 x 4s into both long and shorter pieces according to our plan. Below are the measurements we used for each piece. Once all the pieces were cut, it was time for installation. While not overly complicated, this step required close attention to detail. Ensuring everything lined up perfectly was key, and the level became our trusted ally throughout the process. Taking our time and double-checking our work ensured a seamless and professional-looking result that we were proud of. Here are the measurements we used for each piece:
Here’s a simple step-by-step guide for installing the boards:
- Apply liquid nails to the back of your board.
- Use a level to ensure the piece is perfectly straight.
- Hold the piece in place and hammer in a finishing nail to secure it.
- Repeat this process for all five pieces in the section.
- Move on to the next section and repeat the steps.
- Continue repeating these steps until you’ve covered the entire area.
By following these straightforward instructions and taking your time, you’ll achieve a beautifully installed Wainscoting Wall that enhances the aesthetic appeal of your space.
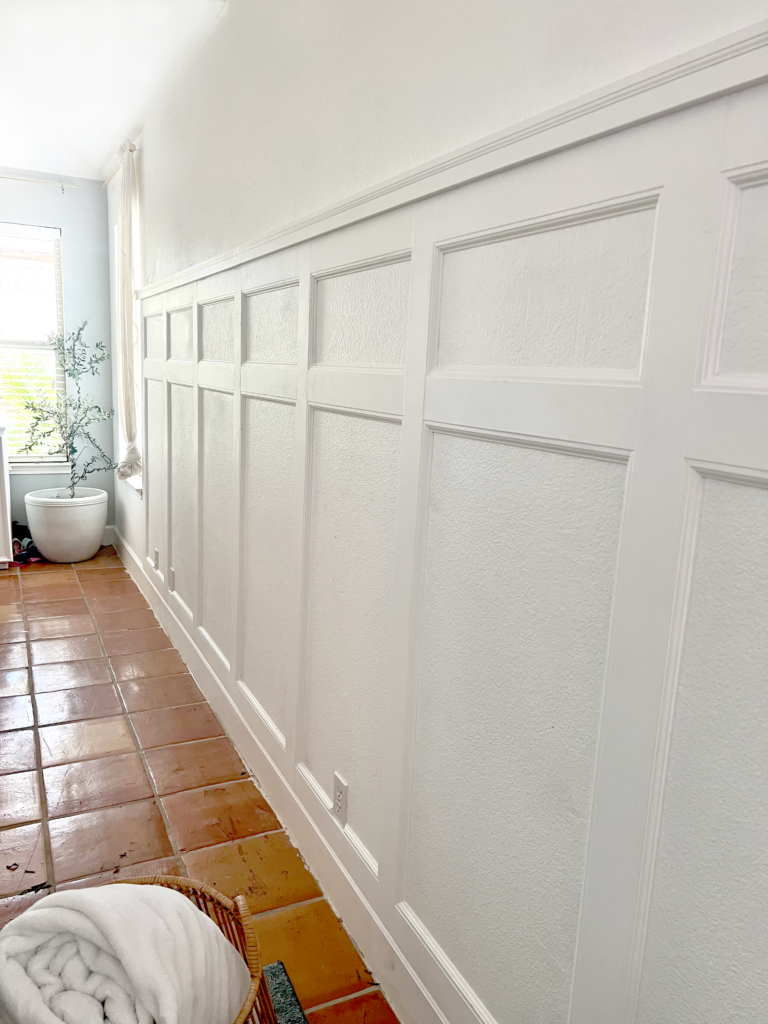
5. THE DETAILS:
To give your Wainscoting Wall a polished and finished appearance, consider adding small wall molding. I opted for 3/4 inch molding, which perfectly complemented the boards. After securing the molding in place, I painted them white to seamlessly blend with the rest of the wall. This final touch elevated the overall look of the wainscoting, adding a refined and cohesive finish to the project. Don’t underestimate the impact of these small details—they can truly transform the aesthetic of your space.
We are thrilled with how this wall turned out—it’s bright, beautiful, and truly enhances the entire space. As soon as you walk in, it’s one of the first things that catches your eye. We hope you’ve enjoyed following along with this project as much as we’ve enjoyed sharing it with you. If you have any questions, please feel free to leave a comment below, and I’ll be sure to respond promptly. Your feedback and inquiries are always welcome, and I’m here to help in any way I can.
Love it, came out so pretty! I want to do it in my entry hallway. With these details, I might be able to do it myself… ;) nah, I need help!!! Hopefully my husband wants to help out.
This is such a nice way to really make a space look amazing! Just wish my husband (or me) was a little more handy. Lol.
Love it! It turned out great!
Love it, but not sure what chair rail trim you used. Does not look like the House of Fara that you listed. Did you then but the brink molding on top of that? I am working on the same thing